Second Chance Rocker Redo {Ultimate Blog Swap}
Today I’m participating in the Ultimate Blog Swap. You’ll find me posting over at Pixie Mama with My Summer Wreath Tutorial, and I’m excited to welcome Dani from 12 Stone Dance to The Casabella Project:
I am so excited to be a guest here at The Casabella Project! This blog is now firmly in my favourites. When I signed up for this Blog Swap extravaganza, I knew I was blessed to be get to be featured here! So I hope you enjoy! I would love to have you over for a visit on my blog and maybe you could stay for some tea and crumpets (yes, thats right, I’m a brit living the canadian life in the prairies of Saskatchewan).
I have found in the small prairie town I live that it is hard to come across good finds. We have one thrift store, which believe me, I search high and low for project possibilities, and the dollar store definitely gets a working over regulary too. I have been blessed to live next door to one of my best friends, who happens to be an awesome DIY crafter! We often have craft nights with the girls or just hang out doing crafts together. I actually used her basement to finish up this project!

I think it’s beautiful in it’s original state, but I needed to “vintage” it up! I love everything vintage, from floral bed sheets found at thrift stores, to jewelry, and especially furniture I can transform!
I cant wait to hold our first baby in september while rocking in this chair.
STEP 1
First, I needed to sand it down a bit, I wanted to prime it and make sure it was coated well!
My husband (who is starting to understand this whole crafitng craze I am in) found this at a garage sale for $7, although after all the stuff we bought from there the guy gave us a deal for everything, so it was probably less that $7 in the end!
Works like a charm!
I never thought I would be excited about a sander! 🙂
The husband went over some of the more intricate nooks and crannies with a sanding block… he helped as my growing belly is making it harder to bend down for long periods of time!
STEP 2
I am the worst for taking short cuts, things like not sanding or not cleaning after I sanded and just going straight to painting. But I knew I had to do this right. It does make a difference to take time to do the tedious things to get a better result. Once I sanded, as with any sanding, always give it a wipe down!
STEP 3
Volia! The first coat is on. I actually used paint and not spray paint for the prime, it wasn’t as necessary as I thought since the spray paint I got covered well and it got in all the corners my brush wouldn’t. I’m glad I did the first coat just to give the spray paint a little more to stick too!
Step 4
Now onto covering the kinda worn down green covers (not quite a fan).
This beautiful fabric I found at a Value Village! I fell in love, and this was the perfect time to pull it out!
I measured how big I need the pillow cover to be out of my fabric, and because the foam was a light yellow, i didn’t line the sheet, but I would probably do that just to make it a bit thicker!
Step 5
Get your sewing on. Turn the fabric inside out so that when you flip it inside out, your stitching will be on the inside. Make sure you leave a little opening to be able to pull it back through!
Step 6
Ahh, this makes my crafting heart happy and cheerful! So much lighter, brighter and vintage than the green! It’s starting to come together!
Step 7
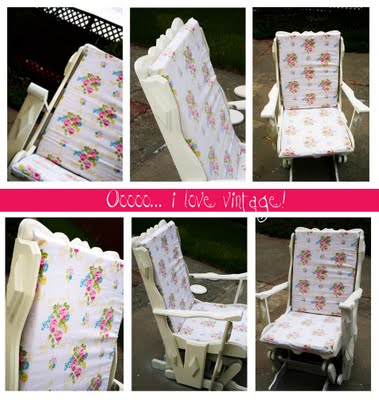
Now for putting it all together. After the first coat of paint, I chose an ivory spray paint to cover the chair in, because the white was a little too stark and I wanted to soften it up a bit too!
Covers on. It’s so exciting to see a project come to together the way you wanted it to!
And here is one more picture for a close up!
I hope you enjoyed this, and that it has inspired you to find a piece that you can give a second chance to. I love that this chair represents a story behind it. I love that it belonged to a dear friend, and that she held all her children in it. I also love that this chair has a future. It’s not really about the chair, but it’s about the baby I will hold in it soon! Can’t wait!
*****
Thanks Dani!
Visit Life…Your Way to see all of the Ultimate Blog Swap participants!


First time i have checked your websight and your project on the rocking chair looks very lovely, you are a very crafty girl lol, wish i had the time to pick up my past crafts, i used to decorate cakes, make clothes, knitwear, decoupage pictures, blinds and curtains though not many, i even collected calligraphy books but never got the time to learn it. You are very lucky girl keep up the lovely work, i’ll be retired before i get back to doing crafts, so miss it, but no time for it, shame, it can be quite therapeutic. Keep showing your work. love from us all over here. Wendy x